Don't you just LOVE wednesday's? Say hello to wednesday "hello wednesday" It's all downhill from now on to the weekend - yippee!!!
Oooh there are lots of things going on down Tin Pot Lane this week, we have been busy planning, photographing new ranges and a challenge blog...............so we have a DT call. More about that later in the post, so please read on.
First off my creation for todays Hello wednesday and a tutorial to boot, see I said we had been busy! When I made this hat Mollie just HAD to wear it! She wore it all round the office, she wore it in the car on the way home, and Rachie tells me she wore it to bed. Aaaahh. We went on a family day out to a House Garden event, and yes you guessed it Mollie wanted to wear her NEW hat. But not everyone can carry off such a clash in colour, red strawberry dress with a Lime green hat -ummmm what a colour combo!
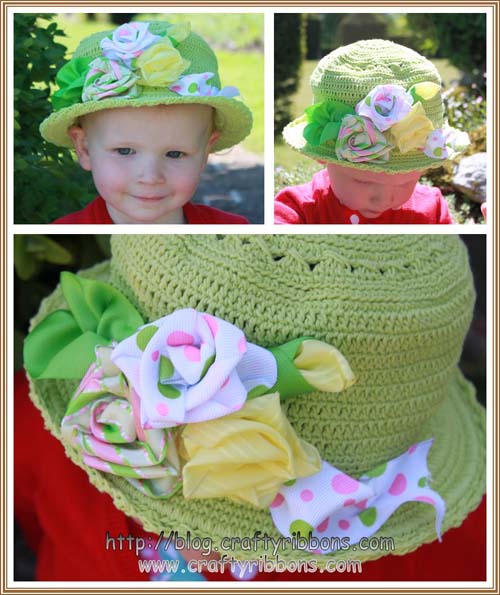
These roses only take a minute to make, they really do. You do not even have to sew them if you do not want to, I just secure with wire. So here is what you do.

1. You require about 80cms of ribbon , scissors, wire to secure or a needle and thread.
2. Find the centre of the ribbon and fold one side of the ribbon down to create a right angle.

3. The ribbon that is on the bottom, fold up over the top ribbon.
4. The ribbon that is now on the bottom, fold across over the top ribbon.
Keep repeating this folding until you come to the end of the ribbon.

5. Once all the folds are completed it should look something like this.
6. Pick up the ribbon and hold it between thumb and finger.
Hold tightly the two ends and start to pull ONE of the ends.

7. As you pull the ribbon it will slide through the centre of the rose.
8. Keep pulling until your rose appears.

9. Stop pulling the ribbon end when it looks like this.
10. With a piece of wire, wrap the two ends of the ribbon together underneath the rose.
You can secure with a needle and thread if you wish.
Cut away the excess pieces of ribbon, one will be short - the piece you did not pull,
and the other will be long - the piece you pulled. This cut off piece can be used to make leaves and buds.

11. One finished Ribbon Rose.
See I told you they were quick! Go and have a play.
We all know you like our Ribbon Challenges, and you love adding ribbon to your cards and projects, soooooo..................... how about a dedicated Crafty Ribbons Challenge Blog here. (This will not affect our own Ribbon Challenges, they will be continuuing) Every two weeks we will set a new challenge for you to have a play with, lots of ribbon prizes and website vouchers to be won, just by entering your card into our ribbon challenge.
But before we can do this we need a Crafty Ribbons Design Team - would you like to be on the team? You will be sent a fresh new bundle of ribbons to create your project or card, you must have an active blog and able to take good photos. The team will be managed by Mandy and will be run completely seperate from this blog. This DT call is open to everyone from around the world, not just UK crafters.
So if you are interested then please link up on the Challenge Blog. The first bundle of ribbons you will get to play with are our EXCLUSIVE Crafty Ribbons Christmas Ribbons. Mandy was the first to see these ribbons outside of our warehouse team - she went mad over them and even tried to smuggle a few into her pockets!!! I am not that mean, I manged with shaky hands to cut lengths of my samples and give to her, months of hard design work left the warehouse in a carrier bag!!
If you want to read more about the challenge then do not forget to have a look here, become a follower and you can have a chance to win some super blog candy. We launched a new range of Cherry ribbons yesterday, they could all be yours by leaving a comment and linking up
One very excited